Fixing Plunders (OS) Image problem
This is a post about:
- Operating Systems
- The Linux Boot process
- Installation methods
- Doing weird
hackythings 😃
In this post I’m going to cover the options that are typically available to an end user when looking to install an Operating System (mainly Linux, but I may touch on others 🤷) , we will touch on their pros/cons and look at what the alternatives are. We will then discuss concepts of immutable Operating System deployments and how we may go about doing so, including the existing eco-system. Finally we’ll look at what is required (using Go) to implement an Image based Operating System creation and deployment, and how they’ve been implemented into plunder.
Getting an Operating System deployed
Most Operating Systems are deployed in relatively the same manner:
- A machine boots and reads from installation media (presented locally or over the network)
- The target disks are prepared, typically partitions may be created or HA technologies such as disk mirroring and then finally these partitions are “formatted” so that they contain a file system.
- Either a minimal set of packages or a custom selection of packages will be installed to the new file system. Most Operating Systems or distributions have their own concept of “packages” but ultimately under the covers the package contains binaries and required libraries for an application along with some logic that dictates where the files should be written too along with some versioning information that the package manager can use.
- There may be some final customisation such as setting users, network configuration etc..
- A Boot loader is written to the target disk so that when the machine is next powered on it can boot the newly provisioned Operating System.
The order of the steps may differ but pretty much all of the major Operating Systems (Linux, Windows, MacOS) follow the same pattern to deploy on target hardware.
Options for automating a deployment
There are usually two trains of thought when thinking about deploying an Operating System, which are scripted which will go through the steps listed above but no user interaction is required or image based which takes a copy of a deployment and uses that as a “rubber stamp” for other installs.
Scripted
Operating Systems were originally designed to be ran on hardware of a predetermined configuration, which meant that there was no need for customising of the installation. However as time passed a few things happened that suddenly required Operating Systems to become more flexible:
- Usage of computers sky rocketed
- The number of hardware vendors producing compute parts increased
- A lot of traditional types of work became digitised.
All of these factors suddenly required an Operating System to support more and more types of hardware and it’s required configuration(s), furthermore end-users required the capability to tailor an Operating System to behave as needed. To provide this functionality Operating System vendors built rudimentary user interfaces that would ask questions or provide the capability for a user installing the OS to set various configuration options. This worked for a period of time but as more and more computer systems were deployed this became an administrative nightmare, as it was impossible to automate multiple installations as they required interaction to proceed and finally the need for humans to interact brings about the possibility of human error (Pesky humans) during the deployment.
In order for large scale IT system installations to take place then operations needed a method for unattended installations, where installations can happen without any involvement. The technique for this to work was to modify the Operating System installation code so that it could take a file that can answer all of the questions that would have previously required user input in order to progress the installation. These technologies are all named in a way that reflects that:
- preeseed
- answer file(s)
- kickstart
- jumpstart
Once a member of the operations team has “designed” the set of responses for their chosen Operating System then this single configuration can be re-used as many times as required. This removes the human element from accidentally entering the wrong data or clicking the wrong button during an Operating System installation and ensures that the installation is standardised and “documented”.
However, one thing to consider is that although a scripted installation is a repeatable procedure that requires no human interaction it is not always 100% reliable. This installation still runs through a lot of steps, such as every package has to be installed along with the prerequisite package management along with configuring devices and other things that happen during that initial installation phase. Whilst this may work perfectly on the initial machine undiscovered errors can appear when moving this installation method to different hardware. There have been numerous issues caused by packages relying on sleep during an installation step, the problem here usually is due to this package being developed on a laptop and then moved to much larger hardware. Suddenly this sleep is no longer in step with the behaviour of the hardware as the task completes much quicker than it had on slower hardware. This has typically led to numerous installation failures and can be thought of as a race-condition.
Image
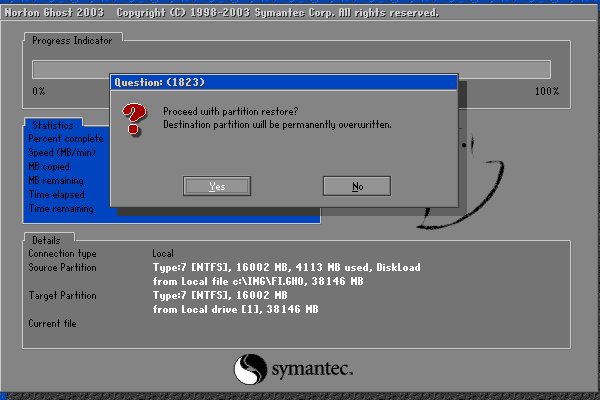
Creating an image of an existing Operating System has existed for a long time, we can see it referenced in this 1960s IBM manual for their mainframes.
Shoutout for Norton Ghost !!
I have covered image based deployments, but my (google) research show ghost (1998) pre-dates Preseed/DebianInstaller (2004) and Kickstart(RHEL in 2000) and even Sun Microsystems with jumpstart (earliest mention I can find is Solaris 2.8 which is 1999).
Anatomy of a disk
We can usually think of a disk being like a long strip of paper starting at position 0 and ending with the length of the strip of paper (or its capacity). The positions are vitally important as they’re used by a computer when it starts in order to find things on disk.
The Boot sector is the first place a machine will attempt to boot from once it has completed its hardware initialisation and hardware checks the code in this location will be used in order to instruct the computer where to look for the rest of the boot sequence and code. In the majority of examples a computer will boot the first phase from this boot sector and then be told where to look for the subsequent phases and more than likely the remaining code will live within a partition.
A partition defines some ring-fenced capacity on an underlying device that can be then presented to the underlying hardware as usable storage. Partitions will then be “formatted” so that they have a structure that understands concepts such as folders/directories and files, along with additional functionality such as permissions.
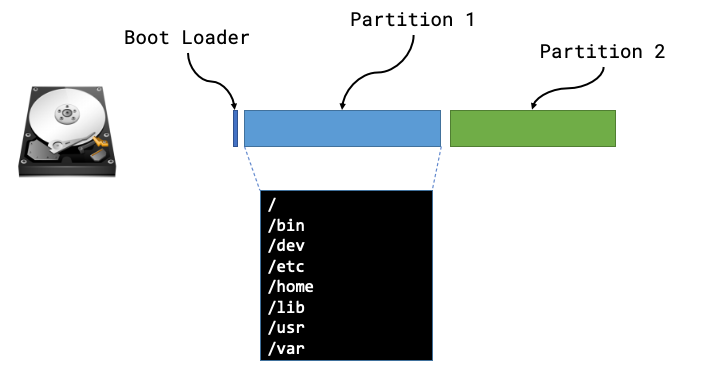
Now that we know the makeup of a disk we can see that there are lots of different things that we may need to be aware of, such as type of boot loader, size or number of partitions, type of file systems and then the files and packages that need installing within those partitions.
We can safely move away from all of this by taking a full copy of the disk! Starting from position 0 we can read every byte until we’ve reached the end of the disk (EOF) and we have a full copy of everything from boot loaders to partitions and the underlying files.
The steps for creating and using a machine image are usually:
- Install an Operating System once (correctly)
- Create an image of this deployed Operating System
- Deploy the “golden image” to all other hosts
Concepts for managing OS images
The concept for reading/writing OS images consists of a number of basic actions:
- Reading or Writing to a storage device e.g.
/dev/sda - A source image (either copied from a deployed system or generated elsewhere)
- A destination for the date from the cloned system, when reading from a deployed system we need to store a copy of the data somewhere
In relation to the final point, there have been numerous options to capture the contents of an existing system over time:
- Mainframes could clone the system to tape
- Earlier “modern” systems would/could clone to a series of Floppy disks and later on CD-ROM media
- Stream the contents of a storage device over the network to a remote listening server.
Reading (cloning) data from a storage device
When capturing from an existing system, especially when this OS image will be used to deploy else where, there are a few things that need to be considered about the state of the source system.
Firstly it is ideal that it is as “clean” as possible, which typically means that the OS is deployed and any required POST-configuration and nothing else. If a system has been up for time or has been used then the filesystem could already be dirty through excess logs or files generated that will clutter the source image and end up being deployed through to all destination servers. We may want to consider removing or zeroing the contents of swap partitions or files as well to ensure nothing is taken from the source and passed to destination machines that doesn’t need to be copied.
Secondly that the disk isn’t actually being used when we want to clone or image its contents, whilst technically possible if the Operating System is busy reading and writing whilst we attempt to copy the underlying storage we will end up with files that could be half-written to or ultimately corrupt. We can boot from alternative media (USB/CD-ROM/Alternate Disk/Network) in order to leave our source disk un-used, which will allow us to copy it’s contents in a completely stable state.
Once we’ve started up our cloning tooling we only need to read all date from the underlying storage device to a secondary data store. We need to be aware that even if we’ve only installed a small amount of data as part of the Operating System our cloned copy will be the exact size of the underling storage device. e.g. a 100GB disk that is installed with a basic Ubuntu 18.04 package set (900MB) will still result in a 100GB OS Image.
Writing an OS Image to a destination device
As with reading the contents of an underlying storage device we can’t (or I certainly wouldn’t recommend) trying to use the same storage device at the same time as writing too it. If you had an existing system running an Operating System such as Win10 and we used some tooling to re-write our ubuntu disk image to the same storage then well …

To circumvent this issue we would need to start our destination machine from another medium such as another storage device leaving our destination device alone until we’re ready to write our destination disk image to this storage.
Finally we also need to consider the sizes of the disk image and the destination storage:
- If our destination storage is smaller than the disk image then our writing of the image will fail. However, the system may start afterwards as the main contents of the Operating System has fit on the storage device. This can lead to an unstable state as the filesystem and partitions have logical boundaries that exist well beyond the capacity of the destination disk.
- On the other hand if we write a 10GB OS image to a 100GB physical storage device then the remaining 90GB is left unused without some additional steps, typically involving first growing the partition to occupy the remaining 90GB of space and then growing the filesystem so it is aware of this additional capacity.
Writing your own OS imaging software
This section will detail the design around software I wrote to accomplish all of the things I’ve discussed above. All of the code samples are written in Go and the source code for the project can be found on the BOOTy repository.
It will be in three parts:
- First, creating a boot environment that allows us to safely read/write from underlying storage
- Second, Reading and Writing from underlying storage
- Finally, post steps.
A solution for a clean environment
To ensure we can make a clean read or write to a storage device we need to ensure that it’s not being used at the time, so we will need to boot from a different environment that has our tooling in it.
Simplest option
We can simply use a live-CD image that allow us to boot a fully fledged Operating System, from here we can use some tooling like dd to take a copy of contents of the storage. The problems with this solution are that we can’t really automate this procedure and we will need a writeable location for the contents of the source disk.
Writing a custom Operating System
Phase one: LinuxKit
My initial plan was to do this with LinuxKit, where the code to handle the reading and writing of the underlying storage would live within a container and I would then use LinuxKit to bake this into a custom Linux distribution that I could then start on remote hosts.
- Start remote host and point to our LinuxKit OS
- Start Linux Kernel
- Kernel boots, finds all hardware (including our storage device(s)
- LinuxKit starts
/initwhich in turn will start our application container - The container will then interact with the underlying storage device (e.g. write an image to the disk)
This solution was quick and easy to write, however a few issues:
- Ensuring console output of what is transpiring
- Stable rebooting or restarting of the host
- Dropping to a console if a write fails
So whilst it did work, I decided I could probably do something a little smaller
Phase two: initramfs
This design uses two pieces of technology, mainly a Linux Kernel and an initramfs which is where the second stage of Linux Booting occurs, if we use the same chronology as above this design would look like the following:
- Start remote host and point to our OS
- Start Linux Kernel
- Kernel boots, finds all hardware (including our storage device(s)
- Kernel starts
/initwithin ourinitramfs, thisinitis our code to manage underlying storage.
At this point our init is the only process started by the kernel and all work is performed within our init binary. Within our initramfs we can add in any additional binaries, such as a shell (busybox) or Logical Volume Manager tooling to manipulate disks (more on this later).
In order for this tooling to work our custom init will need to “setup” the environment so that various things exist within the Linux filesystem, including special device nodes such as /dev/tty or /dev/random which are required for things like writing console output or generating UUIDs for filesystems etc..
Below is the example code that we will need to generate our environment:
1 | package main |
We will need to mount various additional file systems in order for additional functionality to work as expected, mainly systems such as /proc(proc) and /sys (sysfs).
Once our environment is up and running, we will need to use dhcp in order to get an address on the network. There are numerous libraries available that provide DHCP client functionality and we can leverage one to run in a go routine to ensure we have an address and renew it if we get close to our lease expiring before we finish our work.
At this point we would do our disk image work, this will be covered next !
With an init we need to handle failure carefully, if our init process just ends either successfully 0 or with failure -1 then our kernel will simply panic. This means that we need to ensure we handle all errors carefully and in the event something fails ensure it is captured on screen (with a delay long enough for the error to be read) and then issue a command to either start a shell or reboot the host.
On error and we want to drop to a shell then the following code will ensure that the interrupt is passed from our init process to its children.
1 | // TTY hack to support ctrl+c |
Finally instead of simply ending our init process we will need to issue a reboot or shutdown as simply ending init will result in a kernel panic and a hung system.
Note: Before doing this ensure that disk operations are complete and that anything mounted or open has been closed and unmounted, as this syscall will immediately reboot.
1 | err := syscall.Reboot(syscall.LINUX_REBOOT_CMD_RESTART) |
We now have all of the required bits in place:
- Our custom
/initstarts up - The relevant paths are created or mounted
- Any devices nodes are created allowing us to interact with the system as a whole
- We use a DHCP Client to retrieve an address on the network
- In the event of an error we can start a shell process allowing us to examine further as to what the error may be
- Finally we will issue a reboot
syscallwhen we’ve finished
Managing images, and storage devices
With the above /init in place we can now boot a system that has all the underlying devices ready, is present on the network and in event of errors can either restart or drop to a point where we can look into debugging.
We are in a position where we can put together some code that will allow reading the storage and sending it across the network to a remote server OR pull that same data and write it to the underlying storage.
Identifying the server and behaviour
In order to know what action a server should take when it is booted from our custom init we need to use a unique identifier, luckily we have one that is built into every machine its MAC/Hardware address.
1 | // Get the mac address of the interface ifname (in our case "eth0") |
The above piece of code will find the MAC address of an interface passed as ifname and it will then convert that into a string that is a compliant URI string 00:11:22:33:44:55 -> 00-11-22-33-44-55 . We can now use this to build a url that we can request to find out what action we should be performing, so once init is ready it will build this configuration and perform a GET on http://<serverURL>/<MAC address>.
You may be wondering where we specify the <serverURL> address, well we can hard code this into our init alternatively we can pass this on boot as a flag to the kernel MYURL=http://192.168.0.1, this will appear as a environment variable within our newly started Operating System.
1 | serverURL := os.Getenv("MYURL") |
Reading and Writing
We can now call back to a server that will can inform the init process if it should be reading from the storage device and creating an OS image or pulling an image and writing it to a device.
Writing an image to disk
This is arguably the easier task as we can use a number of pre-existing features within Go to make this very straight forward. Once we’ve been told from the server that we’re writing an image, we should also be given a URL that points to an OS image location. We can pass this imageURL to our writing function and use an io.Copy() to write/stream this image directly to the underlying storage.
1 | // New request to GET the actual image |
Reading from Disk to an Image
The main issue we hit with reading from a disk to a remote location is around the large amounts of data, the underlying storage could easily be many many GBs of data that would need transmitting to a remote server. In order to send such large amounts of data over the HTTP protocol we can use a multipart writer that will break up the file and rebuild it on the server side. To do this we create a multipart writer and then as we read chunks of data from /dev/sda we send them as multiple parts over the network.
1 | body, writer := io.Pipe() |
Shrinking Images
Using disk images can be incredibly wasteful when thinking about network traffic, a 1GB Operating System on a 100GB disk requires sending 100GB of data (even when most of the disk is probably zeros). To save a lot of space we can expand our read/write functions so that we pass our data through a compressor (or expander in the other direction), we can do this very easily by modifying the above code examples.
1 | // Reading raw data from Disk, compressing it and sending it over the network |
We can see that we simply “man-in-the-middle” a compression solution that slots straight into the existing workflow that was shown earlier. The results of adding in compression are clear to see when taking an Ubuntu 18.04 standard install on any sized disk 4GB / 100GB the compressed OS Image is always around 900MB.
Tidying up
We could simply stop here and we have all of the components in place to both create and write Operating System images to various hardware over the network, however in a lot of cases we may want to perform some POST configuration once we’ve deployed an image.
Grow the storage
To perform this we (in most circumstances) require some external tooling, if our base Operating System image used technologies like LVM etc.. then we’ll need additional tooling to interact with them. So within our initramfs we may want to create a static build of LVM2 so that we can use this tooling without requiring a large amount of additional libraries within our RAM disk. One other technique we can use is to make use of tooling that may exist within the Operating System Image that we’ve just written to disk, below is a sample workflow:
- Write Operating System image to
/dev/sda - Exec out to
/usr/sbin/partprobewithin out ram-disk to scan/dev/sdaand find our newly written disk contents - Exec out to
/sbin/lvmto enable any logical volumesTODO: look at BLKRRPART to replace partprobe
At this point our /init will have an update /dev that will have any partitions (/dev/sda1) or logical volumes (/dev/ubuntu-vg/root) present at which point we can act on these partitions to grow them and their filesystems.
Some cheeky chroot manuveurs
As mentioned we can use a workflow that means we can use the tooling that exists within our newly deployed Operating System instead of filling our ramdisk with additional tooling and the associated dependencies.
The following workflow will grow a 900MB image written to a 20GB disk that uses LVM:
- Mount the root volume inside the ram-disk
/dev/ubuntu-vg/root->/mnt - Use chroot to pretend we’re inside the newly deployed Operating System grow the underlying partition
chroot /mnt /usr/bin/growpart /dev/sda 1 - Again chroot and update LVM to see the newly grown disk
chroot /mnt /sbin/pvresize /dev/sda1 - Grow the root logical volume
chroot /mnt /sbin/lvresize -l +100%FREE /dev/ubuntu-vg/root - Finally grow the filesystem within the logical volume
chroot /mnt /sbin/resize2fs /dev/ubuntu-vg/root - Finally, unmount the logical volume ensuring that any writes are flushed!
Configure networking and other things
The above workflow for growing the storage mounts our newly provisioned disk image, once we’ve finished growing the disk/partitions and filesystem we have the opportunity to do additional post-deployment steps. For networking this could include writing a static networking configuration given too us from the provisioning server to the underlying filesystem before we unmount it and boot from it.
Overview
In this post we have detailed some of the deployment technologies that exist in order to provision Operating Systems and we can appreciate that there are a number of options available to us about which approach can work best. We’ve also stepped through various code snippets that detail some of the functionality that has recently been added into plndr to add the capability to create and use OS images to quickly and efficiently deploy Operating Systems to bare-metal (and virtualised) servers.
All of the source code samples came from BOOTy which is a project to build an initramfs that can perform a call back to a plndr server to find out it’s course of action.
Any questions, mistakes or corrections either add in the comments or hit me up on twitter -> thebsdbox