Designing and Building HA Kubernetes on Bare-Metal
Undeterred by the memes and “thought leadership” I decided I’d finally complete this architectural overview of deploying Kubernetes on bare-metal.
To begin with we need to fix the naming.. no-one has ever deployed Kubernetes on bare-metal. You deploy Kubernetes on an Operating System, that OS can be installed on bare-metal hardware or virtual hardware etc.. (moving on).
This post ended up sprawling on much further than I ever really intended it to, so It’s broken into four main sections:
- Why would I bother with bare-metal in the first place?
- What does the operating environment look like, i.e. what do I get to build my cluster with?
- Architectural decisions and designs when deploying a cluster on bare-metal
- Actual steps to deploy the cluster… (probably what most people would care about)
One other assumption that this post takes when considering bare-metal is that the we’re typically in an on-premise environment or in an environment that doesn’t present any existing services so everything will need to be created to build the HA cluster. For further clarification about what bare-metal means you can start here
So lets begin!
Why Bare-Metal?
After having a colleague read through a draft of this post, his immediate thoughts were:
“I’m left feeling a bit ‘why would I do this’ 🙂”
It turned out that I’d not really given any actual positive reasons for running Kubernetes on Bare-Metal… So why would anyone go to the trouble?
Control
If we’re not building our Kubernetes clusters on bare-metal, then typically we’re building them in “the cloud” !

If that is the case then we typically will be presented with two options to deploy our clusters:
- Managed as a service (KaaS/CaaS or whatever marketing call it these days), but effectively the cloud provider architects and owns the cluster architecture and you get access to deployed solution.
- DIY, virtual hardware + virtual networking followed by a bit of rolling up the sleeves and “hey-presto”!
Both of these options are fantastic and provide a solution if you need to move quick (KaaS) or need a degree of flexibility (DIY). Given that these two examples appear to cover most use-cases why should we care?
Well mainly control and customisation.. I’m not sure if it’s just me but anything that is a prebuilt “completed” solution warrants a desire to immediately deconstruct to understand, and customise to suit needs that I didn’t know that I had.
A lot of this can crop up in cloud environments, where architectural decisions around the entire cluster (KaaS) have already been decided and can’t be changed. This can also exist even in a DIY cluster in cloud environments, where virtual machines sizes or configurations are fixed limiting cluster flexibility. It can even extend to design decisions on networking functionality or technologies to limitations on scale.
Design / Architecture and Edge
This is tied to the above point, but it is still relevant to be called out as it’s own reason. One of the most common reasons for a bare-metal requirement is that the design and architecture requirements. Often the applications that are being migrated or being re-designed to “cloud-native” principles may need access to existing systems that can’t be changed or updated. Alternatively there may be a requirement on things like FPGAs or types of GPUs that simply aren’t available within alternative environments.
One other requirement that is starting to become more and more common are edge clusters, which are typically small on-site clusters that will handle local processes in things like stores, offices, warehouses etc.. and will send the results back to central processing once complete. In most use-cases the infrastructure can be 2-3 1U servers to a stack of Raspberry PIs, all driven by things like application needs and physical space and power.
Workloads
In a lot of scenarios running a “simple” workload on bare-metal versus within a cloud environment won’t look any different. However there will be a number of application workloads that will require bare-metal:
- 100% predictable performance that dictate no noisy neighbours or overhead
- Custom or specific hardware: Crypto, GPUs or FPGAs
- Data locality and/or local laws
- Application network requirements or hard coded addresses
- Operational team skillset (having to learn a cloud provider technology stack)
Security and locality
Some applications that process customer, financial or personal data may (by law) have requirements that dictate that all communication paths or compute locations have to be verifiable. Unfortunately the nebulous behaviour of the cloud means that in some cases it’s not possible at the time of an audit to reliably say where customer data is located. In these situations the most common strategy is to have both the data and processing work done in an owned or co-located datacenter that meets security and legal requirements.
Also with bare-metal the onus to provide security is on the bare-metal or infrastructure operators, allowing them to be as bleeding edge when it comes to patches and updates. This is true not just for the applications, the Kubernetes cluster and the Operating System but also the hardware devices such as server firmware and networking devices. With a cloud environment the underlying infrastructure vendors or it’s vulnerabilities isn’t always commonly disclosed, meaning that you’re at the mercy of the cloud provider to handle this level of patching and fixes.
Lock-in?
Finally, lock-in … I don’t work in sales so I don’t necessarily buy this as a reason. A “well” architected solution can negate a lot of the lock-in, however when things are rushed or you opt to deeply couple with too many cloud services then you can end up in a situation where you’re dependant on this functionality and at which point you may be technically locked in, with a lot of work required to un-pick and re-build this functionality elsewhere.
…
So, with all this in mind what do we have to work with in a typical bare-metal environment ?
Operating Environment
This section will have a brief overview of what is typically available to us in a bare-metal environment, again I typically will consider bare-metal a non-hypervisor on-premises environment.
Compute hardware
With a bare-metal deployment we usually mean installing software onto hardware with no hypervisor present. In some circumstances this may or may not provide better performance or save both money or reduce complexity.
However, if we take into consideration the size of a standard enterprise class server (TBs of ram, 10s of cores/CPUs) we can start to see that we have a huge amount of computing power restrained to a single instance of both Operating System and Kubernetes use-case (worker/control plane). If we just consider the Kubernetes use-case for control plane nodes (low memory and CPU) then bare-metal servers can immediately lead to hugely under-utilised hardware.
We also need to consider the actual deployment of the Operating system, which still relies on technologies that are ~20 years old. With virtualisation we can utilise templates and OS images to rapidly deploy a node on virtual hardware. With bare-metal we need to care about the physical hardware and either take a CD to the machine or aim to deploy using a remote method.
Load-balancing
A highly available Kubernetes cluster requires a load-balancer to provide availability to the control plane in the event a node fails and to balance the load into the control plane. In a cloud environment an end-user clicks the [load-balancer] button and * magic * occurs, followed by a virtual IP that an end user will access to provide both HA and load-balancing to nodes underneath it.
When thinking about a bare-metal on-premises environment we have only a handful of architectural options.
Hardware (appliance) Load Balancer
If budget allows then as part of the architecture we can use a pair of load balancer appliances. We will require a pair of them to provide redundancy incase the appliance fails or requires maintenance. These appliances will typically provide the capability to create an external virtual IP address that can load balance over a number of physical IP addresses.
In some circumstances the load-balancers may provide an API or capability to integrate their functionality into a Kubernetes cluster making it much easier for applications deployed within the cluster to utilise these hardware load balancers for application redundancy.
Software Load balancers
The alternative is to use a software based load balancer which are usually simple to deploy. However in order to provide both load-balancing and high-availability then we will have to implement additional software to sit along side the software load-balancers. These two pieces of functionality are:
Virtual IP address
This functionality provides the capability of having an externally accessible IP address that can move between functioning nodes. This means that users attempting to access a service will use this VIP (virtual IP), which will always be exposed on a functioning node.
Network Service (application) Load-balancing
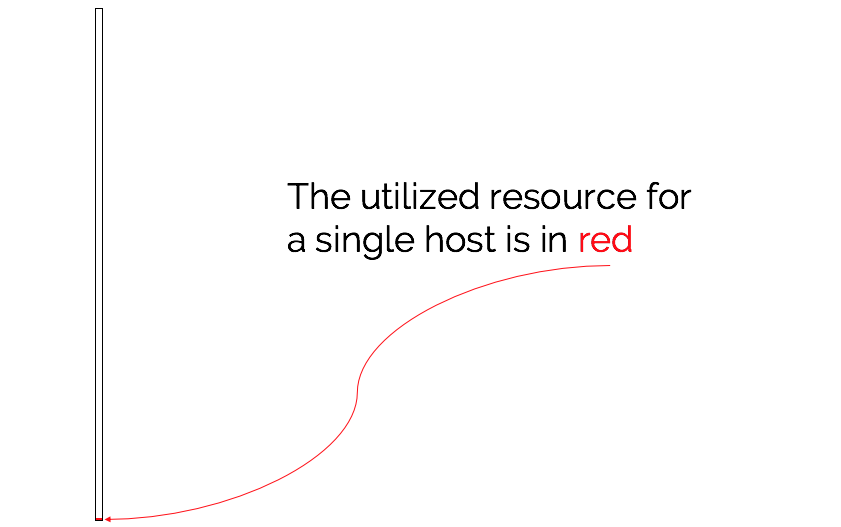
Load-balancing provides two pieces of functionality, it provides high-availability by ensuring that traffic is directed to a working node. It also ensures that traffic can be shared between a pool of working nodes ensuring that load is balanced. This provides the capability of having a larger amount of available service capacity than a single host, that can be scaled up by increasing nodes in the pool.
With both of these pieces of functionality in place we have a single virtual IP that will always direct us to a working load-balancer instance, which in turn will load-balance our access to the network service we want to access.
Automation
The combination of {x}aaS and virtual machines both massively simplify or obscure a lot of the implementation work for deploying servers/services.
Going back to bare-metal we suddenly are back to a large amount of very old and very hard to automate pieces of work, which I’ve previously discussed here https://thebsdbox.co.uk/2019/12/08/The-alchemy-of-turning-bare-metal-into-a-cloud/. We will typically have to follow older installation methods to do the actual provisioning such as kickstart or preseed and only after this can we look at automation such as ansible to automate the deployment of Kubernetes.
Architectural choices
This section provides design decisions that need to be considered when deploying a highly-available Kubernetes cluster on bare-metal hardware and without cloud services. Using some of these design decisions can allow you to be both more efficient in the use of modern hardware and provide a lot of the same sorts of service that people come to expect from a cloud environment!

Nodes
Node sizing typically falls into two categories:
- Control-plane node(s) scaled based upon how many workers will be managed, and how much additional API requests will be hitting the manager components
- Worker node(s) scaled based upon the application requirements, often clusters will have more than one application running on them. So your capacity planning will need to ensure that all requirements are captured, along with sufficient multi-tenancy and node labelling where needed
I’ve been back and forth through https://kubernetes.io, looking for anything documents that explicitly say that a control-plane node should look like {x} but I’ve drawn a blank. In the end the only sizing I can actually find is within the documentation for kubeadm, which states:
- Supported OS (ubuntu/centos etc..)
- 2 GB or more ram
- 2 CPUs
- Connectivity
Try finding a server with those specs without a time machine to the year 2000. In a number of engagements that I’ve been part of have consisted of server farms all built from a pre-chosen server specification. Recently in one engagement I came across 2u servers with 2x24 cores and 512GB of ram as their standard build, this meant that this relatively small Kubernetes HA control plane was underutilising:
- 138 cores
- 1530 GB of ram
- Power, cooling and support/maintenance …
What are the options for ring-fencing these control-plane nodes, to allow us to use the remaining capacity …
Virtualise control-plane only
This seems a bit like a cheat, but given the reasonably small requirements for the control-plane components it does make good sense to run the control-plane nodes as virtualised machines (with the adequate resources guaranteed). Regardless of hypervisor or vmm (virtual machine manager) typically a small amount of overhead is required for the emulation of physical hardware along with minuscule performance overheads on I/O. However the benefit of freeing the remaining capacity to be used for other use-cases hugely outweighs any tiny performance or virtualisation inefficiencies.
Kubernetes resource control
In a production environment the control-plane nodes should only be running the control-plane components. This means that anything application specific is only ran on the worker nodes. The main reason that this is a recommendation or usually a best-practice is mainly down to a few key reasons:
- Security: Applications strive to be secure, however we can help security by keeping the running workloads separate to the control-plane
- Management and Operations: Keeping application workloads separate allows easier and clearer monitoring of both the application and the infrastructure (node behaviour)
- Stability: Applications can be end-user facing and sometimes subject to Attacks or denials of service, keeping them separate will ensure that the control-plane is unaffected by these events.
There are a number of options available to us that would allow some workloads to be safely ran next to the control-plane components. All of these would involve modifying the kubelet configuration on the nodes that will be running the kubernetes management components, along with the manifests for the management pieces.
**Would NOT recommend doing this in production**
Kubelet Reserved CPU configuration
(Optional, 1.17 required)
Modify /var/lib/kubelet/config.yaml to ensure that a set of CPUs are reserved for things like the kubelet and system daemons.
In a 24 CPU system the below addition will pin the first four CPUs for system and kubernetes daemons.reservedSystemCPUs: 0,1,2,3
CPU Manager (1.10+ required))
This is discussed in more detail here however, this setting when enabled allows the kubelet to have more “robust” control over how CPU utilisation is allocated to pods. To enable this modify /var/lib/kubelet/config.yaml to ensure that the cpuManagerPolicy: static exists or is modified from none.
Control Plane components
In order for these components to be secured by the CPU Manager we will need to modify their Spec so that they are given the Guaranteed QoS class. We can find the manifests for the control-plane components under /etc/kubernetes/manifests and with the above configuration enabled we can modify these manifests with configuration that will tie them to resources and ensure their stability.
In order to give this QoS class we need to ensure that:
- Both the
requestsandlimitsmatch (or thatrequestis ommitted) - The
limitsforcpuare a whole number (not a fraction)
Modifying the /etc/kubernetes/manifests/kube-apiserver.yaml to have the following resource section, will bind it to a Guaranteed QoS class
1 | resources: |
We can see this by describing the pod:
1 | kubectl describe pods -n kube-system kube-apiserver-cp01 |
The remaining control-plane components will need modifying in the same manner in order to ensure that they all have Guaranteed resource leaving the remaining capacity for other use-cases.
Utilise this “freed” capacity
With some level of protection around the control-plane components we can look into what could make sense to run on this same infrastructure. Both of the above examples should ring-fence resources around processing capacity CPU and application memory. However the control-plane can still be impacted by things like slow I/O, in the case that something else was thrashing the same underlying storage, we could end up in a position where the control-plane components fail or etcd nodes fail due to high latency. A simple solution for this would be to ensure that these two use-cases use different underlying storage, so that neither can impact each other. One other area is system bandwidth, if this additional capacity is used by applications with high bandwidth requirements then it could potentially effect the control-plane components. Again in this scenario consider additional network interfaces that ensure that traffic is completely segregated from the control-plane traffic.
With the above in mind what other utilisation considerations could be taken into consideration?
- Use-case: Ideally keeping the use-cases aligned makes it easier from a security perspective as only the same teams would need to interact with the same node.
- Application load: No/never
Example workloads that *could be considered:
- Logging
- Dashboard
- Ingress
- Load-Balancing
- Container registry (more for HA, if supported)
- Image scanning
- All of the above is a fine balance between getting more utilisation from your bare-metal servers, and ensuring that additional workload is non-impacting to the control-plane whilst introducing minimal operating overhead or security issues.
Networking (load-balancing)
This section is limited to both the networking function of load-balancing and the control-plane for kubernetes. The load-balancing for applications and services that are running within a Kubernetes cluster can be hosted elsewhere and usually is more application focused.
In the event that hardware appliances such as F5s (docs are here) are present then follow the vendor documentation for deploying that particular solution. However in the event we need to roll our own, then we will discuss the architecture decisions and options in this section.
As mentioned above, we require two components for this to be a completely HA and resilient solution:
- Virtual IP, ensuring that an active load balance can always be addressed and accessed.
- Load-Balancer instance, ensuring traffic is load balanced between Control-plane nodes.
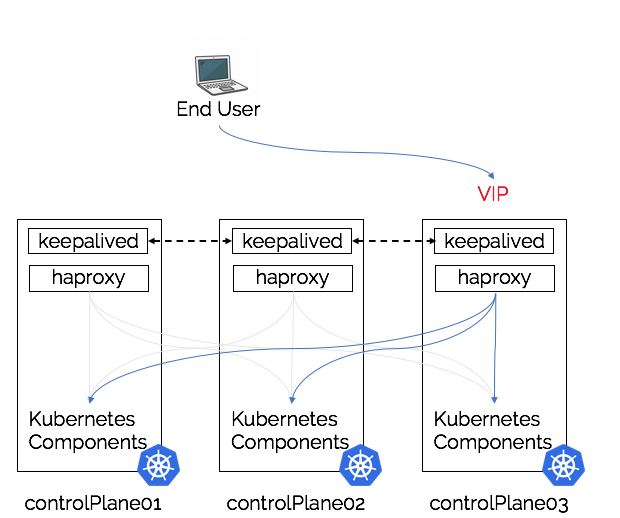
The two software solutions for this that we will be using are keepalived for the Virtual IP address and HAProxy for the load-balancing.
Then finally there are two architectures that we will discuss that can be considered in order to provide a HA design:
External (to the control-plane) Load-Balancer
As with the discussion of stacked vs unstacked control plane nodes (etcd on the same nodes), we also have the architectural decision of co-locating the load-balancing components on the same nodes. This first architecture will utilise two systems external to the Kubernetes nodes to create an external load-balancer pair, that under most circumstances would in a similar manner to a load-balancing appliance.

Pros
- Load-Balancer is physically separate from Kubernetes Control pane nodes
- Only requires two instances/deployments of the required components
- Easy to scale as not tightly coupled to the control plane nodes
- Opportunity for Kubernetes services running in the cluster or other hosts to be load-balanced by the same external load-balancer
Cons
- Requires it’s own hardware (or virtual hardware)
- Additional management and operational overhead
Stacked (on the control-plane node(s)) Load-Balancer
The opposite the above architecture would be locate the load-balancer components locally to the Kubernetes control plane components. Simplifying the architecture, but creating it’s own architectural challenges.
Pros
- Simplifies deployment, control plane nodes are always deployed with all of the required components
- Scaling becomes simplified, going from 3 -> 5 control plane nodes involves the deployments of 2 more control plane nodes and adding into load balancer/VIP configuration
- Reduces the infrastructure requirement as load-balancing shares the same infrastructure as the control plane components
- Possibility of one-day having
kubeadmmanage the load-balancing lifecycle in the same way that it now managesetcd
Cons
- Tight coupling, can result in hard to debug networking, performance or configuration issues.
- An issue with either of the load-balancing components could have a knock-on effect to the control pane nodes without proper precautions in place.
Stacked Port conflicts
Another thing that can appear confusing with co-locating the load-balancers on the same node(s) as the Kubernetes API control plane components are the port configurations. We can’t have two applications listening on the same port, which means if we try to configuration the load-balancer to expose its services on the standard Kubernetes API-server port (6443) then we can’t also have the api-server trying to use the same port.
The architecture diagram below depicts the load-balancer binding to port 6443 and sending requests to one of the API-Servers listening on port 6444:
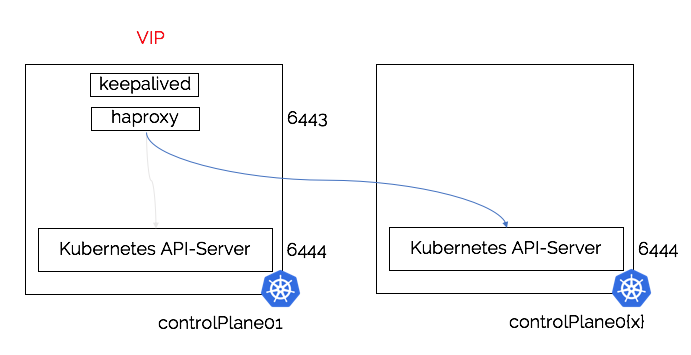
In order to allow the API-server to behave as expected we expose the load-balanced API-servers through the standard port (6443) and configure all of the API-servers to bind to the port (6444). This means that there are no port conflicts, but can cause confusion when trying to debug issues e.g. if the load-balancer isn’t behaving as expected or is down then to connect to a specific Kubernetes API-server we need to remember to connect to controlplane0{X}:6444. Finally when using kubeadm to perform the installation we need to do two additional things:
- Use the VIP and load-balancer port 6443
--control-plane-endpoint “$VIP_ADDRESS:6443” - Ensure that the actual Kubernetes API-server binds to port 6444
--apiserver-bind-port 6444
Note: The --apiserver-bind-port is required for initialising the first control plane and joining of additional control plane nodes.
The outlier (worker) architecture
It could be possible to have the load-balancing components deployed first on identified worker nodes, which would free up any risk of the either workload causing performance issues or outages. However in this scenario we break the concept of workers being something we care about ( cattle vs pets , whatever the analogy is for not having to worry too much about the infra). If workers are suddenly tied to particular workloads that we need to deeply worry about, then we’re in a position where we’ve broken the model to easily replace, scale and destroy our worker pools.
The other issue is that we would need the workers in place before we can actually deploy our control plane, which introduces more chicken and egg architectural design choices.
With all this in mind, lets look at how we actually would get this deployed …
Getting Kubernetes deployed on Bare-Metal
This section will detail the majority of steps that are required to deploy the load-balancing and the Control-plane components of a cluster in a typical bare-metal environment. Worker nodes aren’t covered, but as this deployment will be making use of kubeadm then the workers will be managed through the kubeadm join command.
For workloads that target specific nodes (e.g. nodes with lower core higher frequency for single thread or GPU(s)) then we should label the nodes and use a nodeSelector in the spec as detailed here.
Finally, these steps are for Ubuntu.. If you’re deploying on some-other distro the steps or package names shouldn’t be too different in order to install and configure in the same manner.
The Infrastructure
In this deployment, we will be deploying a stacked architecture which means that the control plane nodes will have everything installed on each node:
- Kubernetes Control plane components
- etcd
- Load-Balancer components
The nodes will consist of three Ubuntu 16.04 or 18.04 standard installations with a user that has Sudo installed.. How that OS gets there, for remote installations I can highly recommend plunder (“Shameless plug”). With the bare-metal nodes up, Operating Systems installed and permanent network addresses given we need to consider one final step (due to the VIP), the network addressing for our cluster.
In our deployment we’ll manage this address scheme quite simply, with the first address for the VIP and all subsequent addresses following in parallel.
Example IP address table
| Node | Address |
|---|---|
| VIP | 10.0.0.100 |
| controlPlane01 | 10.0.0.101 |
| controlPlane02 | 10.0.0.102 |
| controlPlane03 | 10.0.0.103 |
The Kubernetes install one-liner
With our infrastructure in place, we can now begin the installation of Kubernetes! The installation will be following the steps from https://kubernetes.io using kubeadm. However a much more condensed version is below, I like to refer to it as a one-liner as it is technically a one-liner(ish)…
Once the version is set then the next step will update Ubuntu, update repositories and install all of the components that we need to install a HA Kubernetes cluster.
Set the version
This environment variable is used to determine the version of Kubernetes that will be installed by the below one-liner.
export kVersion="1.17.0-00"
Install all the packages
This will install “everything” needed (on ubuntu) for a control-plane node with load-balancing and high-availability.
1 | sudo -E sh -c ' |
Once the above is complete the system is ready to be configured, however ensure that this is repeated on all of the control plane nodes.
Load-balancing the load-balancing
Virtual IP / KeepaliveD configuration
Below are the important sections for the /etc/keepalived/keepalived.conf that will be required on each of the nodes.
Global Definition of the keepalived configuration
1 | global_defs { |
Virtual Service Definition (this is where we define the configuration of our VIP)
As mentioned in the comments on the example configuration below, typically the first node 01 we need to set the state to MASTER. The means that on startup that this node will be the node be allocated the VIP first. The priority number is used during the keepalived cluster elections to determine who will become the next MASTER and the highest priority wins.
For further details on these configurations the keepalived documentation can be found here.
1 | vrrp_instance APIServerVIP { |
Health check (optional)
This can be used to determine if the Kubernetes API server is up and running, if not fail the VIP to another node, but with the load-balancer performing the same task it’s not a requirement.
1 | vrrp_script APIServerProbe { |
Control-plane load-balancing / HAProxy configuration
Below are the additions to the /etc/haproxy/haproxy.conf that will be there by default, ensure you back up the original before modifying and then append the configuration below. As mentioned here we need to remember that the frontend will expose itself on port 6443, and it will load-balance to the kubernetes API-servers listening on port 6444.
1 | frontend http_stats |
Install Kubernetes Control-Plane
With the VIP and load-balancer up and running, we can now install the kubernetes control plane components in a HA configuration using kubeadm.
First node
On the first node we will initialise our Kubernetes cluster using the kubeadm init command with these additional flags.
1 | sudo kubeadm init \ |
If we wanted to use the flags mentioned above in the section Kubernetes resource control then we can use kubeadm to print out all of the configuration yaml and we can edit the sections that are identified using the kind: key.
Step one: Print configuration and save configuration
kubeadm config print init-defaults --component-configs KubeletConfiguration > config.yaml
Step two: Edit InitConfiguration
We need to remove the advertiseAddress as it defaults to a ridiculous default (not sure why), and edit the bindPort to 6444 as this is what the API-Server needs to listen on in order to not conflict with the load-balancer.
Step three: Edit ClusterConfiguration
We need to add the line controlPlaneEndpoint: "LOAD_BALANCER_DNS:LOAD_BALANCER_PORT" to this section so that it uses our VIP address and uses the port of the load balancer.
Step four: Edit KubeletConfiguration
If we want to use the ReservedCPU functionality then add the line: reservedSystemCPUs: 0,1 (edit for the number of CPUs to save).
If we want to have Guaranteed QOS for our Pods then we can add the line: cpuManagerPolicy: static.
We can then apply our configuration with the command:
1 | sudo kubeadm init --config ./cluster.yaml |
This will initialise our control plane on the first node and print out the subsequent join command for other control plane nodes:
1 | kubeadm join 100.0.0.100:6443 \ |
Remaining Nodes
When joining the remaining nodes to the cluster, ensure that you add the --apiserver-bind-port 6444 to ensure that the Api-server binds on a different port to the load balancer sitting above it.
With the VIP and load-balancers up and running, along with our cluster initialised we can now add in our additional nodes and build out a HA/Load-balancer Kubernetes cluster.
1 | $ kubectl get nodes |
To test the cluster, we can stop and start the VIP with sudo systemctl stop keepalived and ensure that kubectl get nodes continues to act as expected. Rebooting of nodes will also create the same experiences as having node failures. We should be able to see logs showing that keepalived is moving our VIP to working nodes and ensuring that access always remains into the running cluster.
Considerations for an unstacked load-balancer
The above guide details all of the steps required to build a HA Kubernetes cluster that has the load-balancing components co-located on the same nodes as the Kubernetes components. If we wanted to build an external or unstacked load-balancing pair of nodes then the process is very similar and covered in brief below.
On both of the load-balancing nodes (loadBalancer01/02) we will need to install the components for the load-balancing:
1 | apt-get install -y haproxy keepalived |
With these components installed on both nodes we can now configure them in the exact same way as before except. The two load-balancing nodes will need the VIP and HAProxy configured in an almost identical manner, however the only consideration is the ports of the Kubernetes API server. As the load-balancer and the Kubernetes API-Server will be on different nodes they won’t have to deal with a port conflict, this means that we can leave the API-Server listening on power 6443 on the controlPlane01/02/03 nodes.
Using Nginx instead of HAProxy
The above examples all use HAProxy as it’s been my default, however Nginx can also be used as a load-balancer that sits between the VIP and the Kubernetes API-server. Below is an identical configuration to the HAProxy configuration above that can be appended to /etc/nginx/nginx.conf:
1 | events { } |
Note: The above is a stacked example that has the load-balancer binding to port 6443 and using the Kubernetes API-servers that are bound to port 6444.
Feedback
Either write something in the comments below or hit me up at @thebsdbox on twitter :-)